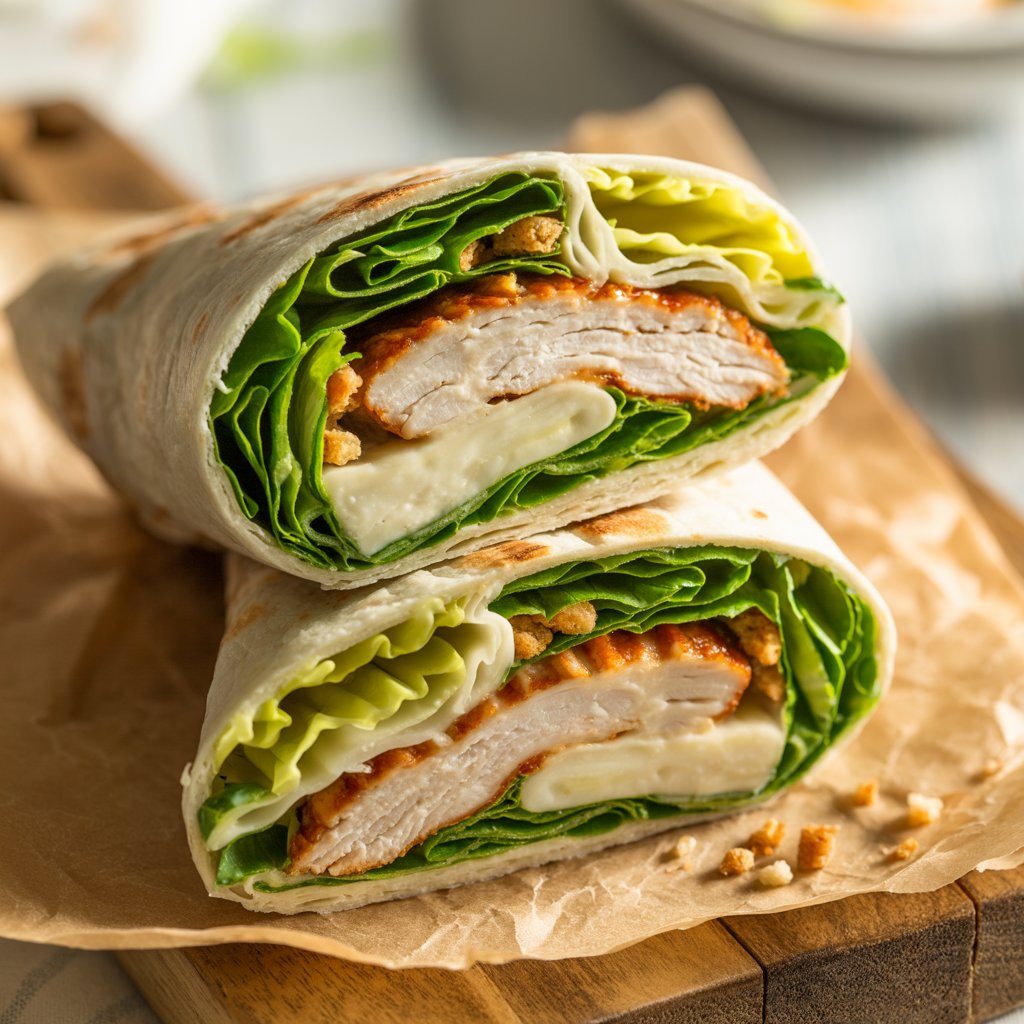
The chicken caesar wrap is more than just a quick lunch option — it’s a delicious twist on the classic Caesar salad, all conveniently rolled up. With tender grilled chicken, crisp romaine lettuce, and creamy Caesar dressing tucked inside a soft tortilla, this flavorful wrap is perfect for busy weekdays, meal prepping, or a tasty on-the-go bite. Curious what makes the perfect chicken caesar wrap? Let’s dive in.
Chicken Caesar Wrap
| Servings: | 4 |
| Prep Time: | 10 minutes |
| Cook Time: | 15 minutes |
| Total Time: | 25 minutes |
| Serving Size: | 1 plate |
Description
Light yet satisfying, the Chicken Caesar Wrap is the crisp white shirt of lunchtime eats—reliable, stylish, and always in season. Each bite delivers the crunch of fresh romaine, the creamy tang of Caesar dressing, and the savory depth of seasoned grilled chicken. Wrapped snugly in a flour tortilla, it is a handheld classic that balances comfort food indulgence with the bright zip of fresh ingredients.
Think of it like Caesar salad’s casual cousin. Perfect for a weekday lunch, a picnic in the park, or an easy dinner, this wrap elevates familiar flavors into a portable, fuss-free meal. The warm chicken paired with chilled greens and creamy cheese makes each bite a flavor and texture harmony. It is the kind of wrap you crave after a morning of errands or a long day at work—equal parts refreshing and filling.
Why You’ll Love This Recipe
This Chicken Caesar Wrap is perfect for anyone seeking a quick and flavorful meal that does not sacrifice taste for convenience. It is easy to assemble in minutes but tastes like something from your favorite cafe. The seasoned chicken can be prepped ahead of time, making this wrap your go-to option all week long.
Eating well on busy days should not mean eating boring. This recipe is flexible enough to suit many dietary preferences—it can easily be made low-carb, gluten-free, or even vegetarian with a few simple swaps. Perfect as a meal prep lunch or a grab-and-go dinner, it is as versatile as it is delicious.
Serving and Storage Tips
These wraps are best enjoyed fresh, but they can be made ahead for up to 2 days. Wrap them tightly in parchment paper or foil and keep refrigerated. For the best texture, store the lettuce and dressing separately unless eating immediately, and assemble just before serving to avoid a soggy wrap.
If preparing chicken ahead, store it in an airtight container in the refrigerator for up to 4 days. Reheat chicken on the stovetop or microwave until warmed through before using if preferred warm. Freezing is not recommended for fully assembled wraps, but the cooked chicken can be frozen up to 2 months and thawed overnight in the fridge.
Ingredients
- 2 boneless skinless chicken breasts
- 1 tablespoon olive oil
- 1 teaspoon garlic powder
- 1 teaspoon kosher salt
- 1 teaspoon black pepper
- 4 large flour tortillas
- 4 cups chopped romaine lettuce
- 1 cup Caesar dressing
- 1 cup shredded Parmesan cheese
- 1 cup croutons crushed slightly
- Juice of half a lemon
Equipment
- Grill pan or skillet
- Mixing bowl
- Tongs
- Cutting board
- Chef’s knife
- Measuring spoons
- Serving platter
Instructions
- Preheat your grill pan or skillet: Set it over medium-high heat. While it warms, rub the chicken breasts with olive oil, garlic powder, salt, and pepper. Use your hands to massage the seasonings in for even coverage.
- Grill the chicken: Cook for about 5 to 6 minutes on each side until the chicken is golden and fully cooked with an internal temperature of 165 degrees Fahrenheit. Once done, transfer to a plate and let rest for about 5 minutes to keep the juices in.
- Make the salad: While the chicken is resting, chop the romaine and toss it in a large mixing bowl with Caesar dressing, shredded Parmesan, crushed croutons, and lemon juice. The lemon really brightens the whole wrap—it is my must-have addition.
- Slice the chicken: After it has rested, cut the chicken into thin strips. Thinner slices make the wraps easier to roll and eat.
- Warm the tortillas: One by one, warm each tortilla in the skillet you used to cook the chicken or microwave for about 15 seconds. This makes them softer and less likely to crack.
- Assemble: Lay each tortilla flat. Spoon some of the Caesar salad in the center, add chicken strips, then fold the sides inward and roll it up tightly like a burrito. Be generous but do not overfill—it needs to wrap neatly.
- Serve: Slice in half for presentation if you like and serve immediately, or wrap tightly for a grab-and-go meal later in the day.
Nutrition per serving
| Calories | 320 |
| Protein | 25g |
| Carbohydrates | 3g |
| Fat | 22g |
| Sugar | 0g |
| Fiber | 0g |
| Sodium | 580mg |
For extra flavor, use freshly grated Parmesan and do not skip the lemon zest. Leftovers keep well for 2 days in the fridge.
FAQ
Can I use frozen chicken breasts?
Yes, just be sure to fully thaw the chicken in the refrigerator overnight before seasoning or cooking. Pat dry with paper towels to ensure a good sear.
What type of Caesar dressing works best?
Look for a high-quality refrigerated dressing or make your own. My favorite store-bought version is creamy with just the right amount of anchovy and garlic. If you prefer a lighter version, go for Greek yogurt-based dressings.
What sides go well with this wrap?
Try serving it with a crisp apple, kettle-cooked chips, or a side of sweet potato wedges. Even a small bowl of soup complements this dish nicely.
We hope you enjoyed this article about Chicken Caesar Wrap! If you did, we’d love to hear from you—drop us a comment and let us know what you think. And if you found it helpful or inspiring, please pin the article or any image from it on Pinterest and like the pin—it really helps more people discover our content and motivates us to keep creating even better ideas. Thank you!

Chicken Caesar Wrap
Ingredients
- 2 boneless skinless chicken breasts
- 1 tablespoon olive oil
- 1 teaspoon garlic powder
- 1 teaspoon kosher salt
- 1 teaspoon black pepper
- 4 large flour tortillas
- 4 cups chopped romaine lettuce
- 1 cup Caesar dressing
- 1 cup shredded Parmesan cheese
- 1 cup croutons crushed slightly
- Juice of half a lemon
Instructions
- Preheat your grill pan or skillet over medium-high heat. Rub the chicken breasts with olive oil, garlic powder, salt, and pepper on both sides.
- Grill the chicken for 5 to 6 minutes per side or until fully cooked and the internal temperature reaches 165°F. Remove from heat and let rest for 5 minutes.
- While the chicken rests, chop romaine lettuce and place into a large mixing bowl. Add Caesar dressing, Parmesan cheese, croutons, and lemon juice. Toss well to coat.
- Slice the rested chicken into thin strips.
- Warm the tortillas for about 15 seconds on the skillet or microwave to make wrapping easier.
- Evenly divide the Caesar salad mix and chicken strips among the tortillas, placing the ingredients down the center of each wrap.
- Fold in the sides and roll each tortilla tightly into a wrap.
- Slice each wrap in half if desired and serve immediately.